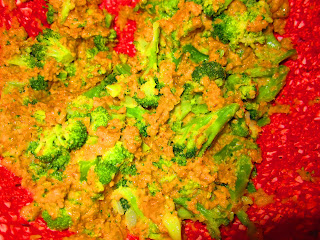
Get ready to shed tears of delicious joy, these are amazing. My husband adamantly refuses to eat vegetables. He won't try them or even give them a chance unless they are creatively disguised. Enter: cheese.
What you need: (serves 2-3)
- 16 ounces of broccoli, chopped (you can use thawed frozen, steamed, etc.)
- 2 cups grated cheddar cheese
- 5 egg whites (or 3 whole eggs)
- 1 cup of italian seasoned breadcrumbs (optional)
- bacon, cooked and crumbled (optional- as much or as little as you choose)
What to do:
- preheat oven to 375
- line baking sheet with parchment paper
- mix all ingredients together in a large bowl
- form small balls and lay on baking sheet
- bake for 25 minutes (turn at halfway)
Sunday, August 19, 2012
Saturday, July 14, 2012
Simple Summer Snack- Melon Ball Salad
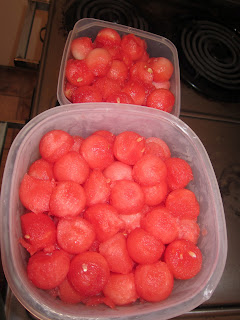
i know this isn't anything special but i'm super pumped about it, so share i must. here's our snack for the week: melon balls. so easy, so healthy, so delicious! i'm going to make a little salad out of them for work on monday with a little bit of lemon or lime & basil. nom nom!
Labels:
basil,
diet,
dinner,
exercise,
family,
fitness,
florida,
gluten free,
health,
lemon,
low carb,
melon,
melon ball,
paleo,
snack,
watermelon,
weight loss
Tuesday, June 26, 2012
Nom Nom Grilled Cinnamon Sweet Potatoes
Tropical storm or not, things taste better on the grill. Maybe it's a Florida thing but we love grilled food. We could eat it every single night, and sometimes we do. Check these babies out.
For something so simple, these things are PHENOMENAL.
What you need: (serves 2 but just add more sweet potatoes if you want to make more)
- 2 sweet potatoes or yams
- cinnamon
- sea salt
- aluminum foil
What to do:
- heat up grill
- lay out large piece of aluminum foil
- slice sweet potatoes into thin round slices (about 1/8 inch)
- place sweet potato slices onto foil (it's ok if they overlap)
- sprinkle cinnamon & sea salt over sweet potatoes
- place 2nd large piece of aluminum foil over top & seal the sides of the foil pieces together like a package
- place on top rack of grill and cook for 25- 30 minutes until cooked soft
NOM NOM NOM
Tuesday, June 19, 2012
Fan- freakin- tastic Ooey Gooey Paleo Fudge Cupcake Brownie thingies
Today was a stressful, ridiculous day. It was one of those days when you want to burst into tears the minute you walk through your door after work. I know we've all had those days. If you're anything like me, stress or crying makes you crave chocolate.
After only 8 months of marriage, my husband has already gotten really good at this game.
Me: "Everything is terrible!"
Handsome Hubby: "You need some chocolate, don't you? Let's go get you some."
This time, I decided to attempt some Paleo friendly brownies, thanks to Juli from paleomg for the idea. We had all these ingredients from last week's aimless wandering around the organic store while I was on vacation so this worked out perfectly.
- 1 1/2 cup dried figs (any stems removed)
- 1/3 cup coconut oil, melted
- 6 tablespoons coconut flour
- 3 eggs, whisked
- 1/2 cup Enjoy Life Chocolate Chips, melted
- 1/4 teaspoon baking soda
- 1/4 teaspoon baking powder
- pinch of salt
Here's what you do:
First, preheat your oven to 350 degrees. Next, put figs in food processor and puree until they have broken down evenly. Add your melted coconut oil to the processor to mix with the figs. Next, add your melted chocolate chips and eggs and mix. Now add your coconut flour, baking soda, baking powder, and salt and mix together.
After only 8 months of marriage, my husband has already gotten really good at this game.
Me: "Everything is terrible!"
Handsome Hubby: "You need some chocolate, don't you? Let's go get you some."
This time, I decided to attempt some Paleo friendly brownies, thanks to Juli from paleomg for the idea. We had all these ingredients from last week's aimless wandering around the organic store while I was on vacation so this worked out perfectly.
Yes, they look like little nuggets of poo. BE NOT AFRAID! They taste like little bites of heaven!
In my desperate moments trying to create some stress relief chocolaty goodness, I forgot to take step by step photos. Sorry.
Here's what you'll need:
In my desperate moments trying to create some stress relief chocolaty goodness, I forgot to take step by step photos. Sorry.
Here's what you'll need:
- 1 1/2 cup dried figs (any stems removed)
- 1/3 cup coconut oil, melted
- 6 tablespoons coconut flour
- 3 eggs, whisked
- 1/2 cup Enjoy Life Chocolate Chips, melted
- 1/4 teaspoon baking soda
- 1/4 teaspoon baking powder
- pinch of salt
Here's what you do:
First, preheat your oven to 350 degrees. Next, put figs in food processor and puree until they have broken down evenly. Add your melted coconut oil to the processor to mix with the figs. Next, add your melted chocolate chips and eggs and mix. Now add your coconut flour, baking soda, baking powder, and salt and mix together.
I cooked mine in a cupcake pan with cupcake liners. I’m not sure what they would be like if you baked them in a normal 8×8 baking dish. Fill liners with the extra super duper THICK brownie batter (i had to peel my batter off a spoon to put into each tin, as thick as cookie dough).


Bake for 20-25 minutes. Let them cool ALL THE WAY before eating them. Trust me on this part.


Bake for 20-25 minutes. Let them cool ALL THE WAY before eating them. Trust me on this part.


Saturday, June 16, 2012
Girly Project: High Heel Hideaway!
This was such a simple & fun little project! Today, a friend and I decided to create a little more storage for my ridiculous collection of shoes (which i previously had piled in a giant metal tub in a corner). This was a great idea, very inexpensive, and simple!
First, we measured the space in my closet to find out how long each heel holder could be. I have about 27" free on the side wall, so we decided to go with 25" holders with 1 free inch on each side. I have pretty small feet but we decided to make the rows about 10" apart since my house is a rental (in case the person who comes after me has bigger heels).
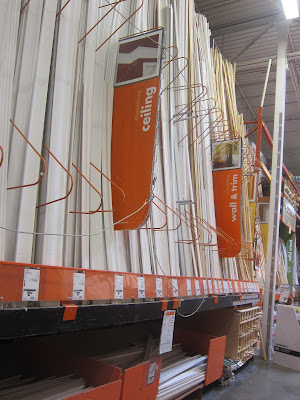
Second, we went on a field trip to Home Depot for supplies.
They have a little station set up where you can measure the wood & cut it to the size you need right there in the store. If your store is anything like mine, you will attract a crowd of menfolk when you walk down the aisle and they will all be eager to help you with anything you need. We thought it would be fun to do it ourselves but we definitely could've gotten out of there without cutting anything if we wanted to.
We found the molding I liked, measured it and sawed it into 25" sections. I bought 5 pieces but only ended up needing 3. 


We also bought some nice looking nails and a sanding block to smooth the edges of the molding where I had sawed them.


When we got home, we just put a nail into the end of each piece and a nail in the middle (and made sure they were level and 10" apart) and we were done! Simple, cute, and fun!


First, we measured the space in my closet to find out how long each heel holder could be. I have about 27" free on the side wall, so we decided to go with 25" holders with 1 free inch on each side. I have pretty small feet but we decided to make the rows about 10" apart since my house is a rental (in case the person who comes after me has bigger heels).
Second, we went on a field trip to Home Depot for supplies.
They have a little station set up where you can measure the wood & cut it to the size you need right there in the store. If your store is anything like mine, you will attract a crowd of menfolk when you walk down the aisle and they will all be eager to help you with anything you need. We thought it would be fun to do it ourselves but we definitely could've gotten out of there without cutting anything if we wanted to.


We also bought some nice looking nails and a sanding block to smooth the edges of the molding where I had sawed them.
My grand total for all the supplies was $12.58. The 5 pieces of molding were only $8.30, so it could've been an $8.00 project if I didn't need the nails and sanding block


Even the cat had fun playing in my old shoe holder!
Monday, June 11, 2012
Paleo Pure Pumpkin Bread !
After another day spent aimlessly wandering the aisles at Rollin' Oats, I decided to take my first shot at a Paleo friendly bread. I was thinking about a banana nut bread or a cinnamon pumpkin bread and decided to try the pumpkin first and the banana next week. I think this bread could also be good with other sorts of roasted squash. Here goes!
You will need:
You will need:
- Raw Honey (2 tbsp)
- Pure Pumpkin or Roasted Pumpkin (1/2 cup)
- Stevia (1/4 tsp)
- Eggs (3)
- Cloves (1/2 tsp)
- Cinnamon (1 tbsp)
- Nutmeg (1 tsp)
- Almond Flour (1 cup)
- Sea Salt (1/4 tsp)
- Baking Soda (1/2 tsp)
There are only 2 steps for this one!
First, mix all ingredients in a food processor and pulse for about 2 minutes.
Sunday, June 10, 2012
Saturday, June 9, 2012
Pretty Darn Good Bacon Bbq Basil Shrimp
We decided to try another paleo friendly recipe tonight (but i added a tiny bit of non-paleo bbq sauce, which is optional if you're more well behaved than i am or less bbq obsessed). I also used a bt of parmesan cheese, which didn't actually enhance the recipe in my opinion so it could also be taken out. My hubby is RAVING about this dinner so I thought I would share. This recipe took about an hour to be ready (there is some wait time), so it's not a quick & easy one but it was so good, it may be worth making every so often. As I type this, the husband is sitting across the room saying over and over again, "that was AMAZING!" haha.
Pretty Darn Good Bacon Bbq Basil Shrimp
You will need:
What to do:
Pretty Darn Good Bacon Bbq Basil Shrimp
You will need:
- 1 lb Large Shrimp, peeled and deveined (I left the tails on this time but I think I will take them off next time I make this)
- Freshly Grated Parmesan Cheese (1/4 cup)- this can be eliminated if you want to for paleo
- Thinly sliced bacon (16 pieces or 1 package)
- Dried Basil (1 tbsp)
- Garlic, minced (2 cloves)
- Olive oil or other paleo approved oil (3 tbsp)
- Bbq sauce (1/2 cup)- this is optional
What to do:
First, combine the Parmesan, oil, and garlic in a bowl & mix together.
Place shrimp into the marinate & let sit for 30 minutes.
Cook the bacon a little bit until it's partially cooked, about 3-5 minutes over medium heat & place on paper towels to drain.
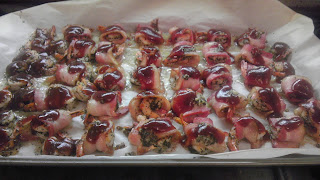
Wrap marinated shrimp with bacon. Depending on the size of your shrimp,you may want to cut bacon slices in halves or thirds (we did it in halves). Place bacon wrapped marinated shrimp on greased baking sheet.
Bake at 400 degrees for 7 to 8 minutes. If you decide to add the Bbq sauce, take the cookie sheet out now & brush Bbq sauce over shrimp and bake for another 2 to 4 minutes.
Bake at 400 degrees for 7 to 8 minutes. If you decide to add the Bbq sauce, take the cookie sheet out now & brush Bbq sauce over shrimp and bake for another 2 to 4 minutes.
Friday, June 8, 2012
Card Creation for Wedding Wishes!
As most couples probably do, we received several wedding cards when we got married. My hubby hates clutter but I can't bear to throw all of these sweet mementos in the trash. What to do? Today, I created a little booklet using our wedding cards. I'm pretty happy with how it turned out & my guy seems to be pleased as well. It was really simple to do so I thought I would share it here.
All you do is buy those metal rings (i got a box of 8 at wal-mart for under $2) and punch holes in the cards. Then, you put the rings through the holes. Voila!
Check it out & let me know what you think!
All you do is buy those metal rings (i got a box of 8 at wal-mart for under $2) and punch holes in the cards. Then, you put the rings through the holes. Voila!
Check it out & let me know what you think!
Wednesday, June 6, 2012
Cave Girl Lemony Pineapple Chicken
In an effort to improve our energy levels, moods, and overall health, my hubby and I have decided to try out the Paleo lifestyle. The basic idea is that you only eat foods that you could've found if you lived in the Paleolithic age. This site contains some very basic info about the lifestyle, if you're interested- Intro to Paleo
Tonight, I made my 1st Paleo friendly dinner and it was very good!
Cave Girl Lemony Pineapple Chicken
Ingredients:
- 1 can sliced pineapple (I used a 20 ounce can)
- 1 garlic clove, pressed
- Cornstarch (1 tbsp)
- Worcestershire sauce (2 tsp)
- Dijon Mustard (2 tsp)
- 1 small lemon, thinly sliced
- 4 boneless skinless chicken breasts (5-6 ounce)
Preheat the oven to 375 degrees.
First, you make the sauce. Drain the pineapple juice from the can into a small mixing bowl and add the garlic, cornstarch, Worcestershire sauce, and Dijon mustard. Mix together.
Next, you arrange the chicken breasts in a shallow baking dish (9 x 13 worked very well) and pour the sauce evenly over the chicken.
Bake for about 25 minutes (depending on thickness of your chicken breasts).
Then, you arrange the lemon slices and pineapple slices on top of the chicken breasts and baste with the sauce in dish.
Bake for another 5-7 minutes and you're done! Enjoy!
Subscribe to:
Posts (Atom)


